
This free online pixel test fills the screen with black, white, red, green, and blue fields so a suspicious dot is easier to see than it would be during normal use. Start the test, compare the same location across the core colors, and use the result guide to decide whether you are looking at a possible pixel defect, a surface mark, or a larger screen problem.
How to run a pixel test online
Clean the screen gently, then avoid pressing or rubbing the panel while you test it.
Prepare the display
Clean the screen gently. Turn off night mode, color filters, and overlays, and use a comfortable brightness.
Enter fullscreen
Start the test and enter fullscreen so browser controls do not cover the display. Check that a camera cutout is not hiding the area you want to inspect.
Step through the core fields
Move through black, white, red, green, and blue. Gray and the other desktop patterns are optional. Look from a normal viewing distance, then move closer to confirm that a point stays in the same place.
Mark what you see
Click or tap a suspicious point to add it to the summary. Note its color, the field where it stands out, and its approximate location.
Choose the next check
Use the result table to choose a cross-check. Consider the Stuck Pixel Fixer only for a small colored or bright point that stays fixed; use the specialist routes for lines, patches, glow, or image-shaped shadows.
What each pixel test color shows
The five core fields help you compare one location. Gray and the other desktop patterns are optional broader checks, not proof of a particular failed component.
Swipe sideways to compare columns.Scroll table to view all columns.
| Test field | What to look for |
|---|---|
| Black | Bright or colored points, and glow around a point |
| White | Dark points, dust, or surface marks |
| Red | A point that stays a different color on red |
| Green | A point that stays a different color on green |
| Blue | A point that stays a different color on blue |
| Gray (optional) | Broad unevenness or faint retention rather than one point |
| Other desktop patterns (optional) | Banding, scaling, lines, or broader display behavior |
How to read your Pixel Test result
Compare the same location across the fields, then use the table to choose a next check. The result describes an observation; it does not identify the failed component or decide warranty eligibility. If you marked more than one point, record them separately—a cluster or broad pattern may be a different screen problem.
Use the visible pattern to choose a cross-check. These are observations and candidates, not proof of a failed component or warranty eligibility.
Swipe sideways to compare columns.Scroll table to view all columns.
| What you see | What it may suggest | Next check |
|---|---|---|
| A dark or unlit point on white and the core colors | May be a dark or dead-pixel candidate. Dust or a surface mark can look similar. | Clean gently, repeat the core fields, and document it if the point remains. |
| A small red, green, or blue point fixed in one place | May be a stuck or fixed-color point. If it moves with content, investigate the source or graphics output. | Repeat the same location and use the screenshot cross-check before considering a repair attempt. |
| A bright white point that stays on against black | May be a bright or hot-pixel candidate. A broad glow suggests a larger panel or backlight issue. | Record the point and use the cross-checks before deciding whether the Stuck Pixel Fixer fits. |
| A line, broad patch, edge glow, or image-shaped shadow | This is not a single-point result. It may relate to damage, backlight behavior, or image retention. | Use the matching specialist route; the Pixel Test and Fixer are not intended for this symptom. |
New display or still within the return window? Document the model, serial number, date, marked location, and test fields before trying a repair method. Save clear photographs and check the exact damage documentation checklist.
Compare a suspicious dot with common look-alikes
A suspicious mark is easier to interpret when you compare its shape and behavior across several fields. A point that stays fixed may be related to the display, but dust, a protector mark, a reflection, or a larger panel defect can look similar. Use the image as a visual comparison, not as proof of a failed component.
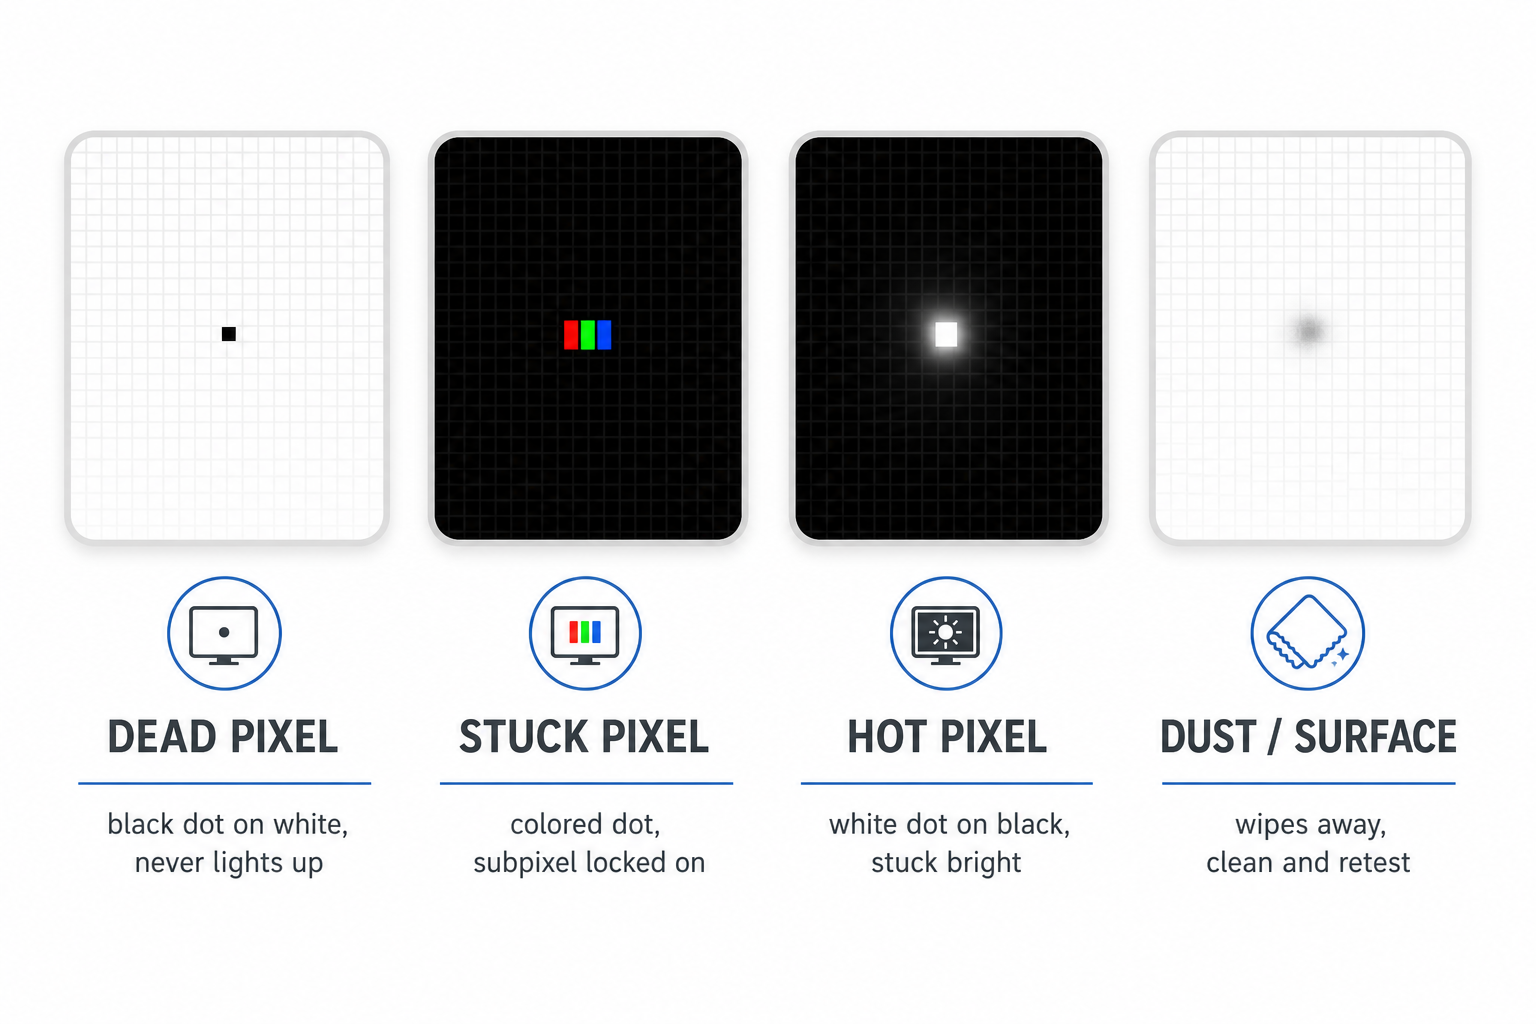
Possible fixer candidate. A small colored or bright point that stays fixed across the test may be a candidate for the Stuck Pixel Fixer. It is a bounded repair attempt, not a diagnosis or guarantee, and it is not intended for dark points, lines, patches, glow, or image retention.
If the mark is larger than one pixel
If the mark is a line, broad patch, edge glow, or image-shaped shadow, a pixel test is the wrong tool. Choose the specialist check that matches the symptom.
Backlight Bleed Test
Use this for edge glow or bright clouding along the sides of a dark screen.
Open test
Burn-In Test
Use this for an image-shaped mark that remains after the original content is gone.
Open test
Screen Color Test
Use this for broad tint, banding, or uneven color rather than one fixed point.
Open test
Document Damage for Warranty
Use this to record lines, cracks, pressure marks, or other physical damage before contacting support.
Open checklist
How to cross-check a suspicious point
This is a browser-based visual check. It displays solid fields and records the points you mark; it cannot inspect panel electronics or determine whether a screen is healthy. The core check is the black, white, red, green, and blue sequence.
A screenshot records the image sent to the display; it does not photograph the panel. If a mark is visible on the physical screen but absent from a screenshot of the same content, a screen-side issue becomes more likely. If the mark appears in the screenshot, investigate the content, software, or graphics output first. This is a useful cross-check, not proof of the failed component.
Choose the cross-check that matches your display
External monitor or TV. Open the display’s own menu or built-in test screen, or switch to another input. If the point stays in the same place, the screen itself becomes more likely than one rendered image or source device. This still does not identify the failed component.
Laptop. Compare the built-in panel with an external display. If the point appears only on the laptop panel, the panel becomes more likely. If it appears on both screens in the same image, investigate the computer or graphics output instead.
Phone or tablet. Use the solid-color test in fullscreen and check whether the mark stays fixed relative to the display. Clean the surface and inspect around a camera cutout or screen protector before treating a tiny mark as a pixel defect.
The core black, white, red, green, and blue check works the same way for LCD and OLED screens. Broad glow, panel-wide unevenness, and image-shaped retention are different problems, not single-pixel results.
Sources and manufacturer guidance
The references below cover pixel terminology, manufacturer policy examples, and flashing-safety guidance. Policies vary by model and region, so always check the support page for the display you are testing.
- Dell Display Pixel Guidelines · DellPixel defect terminology and support guidance.
- HP Pixel Policy · HPManufacturer pixel-defect policy context.
- Lenovo LCD pixel policy · LenovoLCD pixel and subpixel policy guidance.
- W3C Understanding Success Criterion 2.3.1 · W3CSafety guidance for flashing content.
Device screen profiles
Screen-by-screen breakdowns for devices this test works on.
Pixel Test FAQ
Can a Pixel Test fix a pixel?
No. Pixel Test is for inspection. The Stuck Pixel Fixer is a separate, bounded attempt for a plausible coloured or bright point; it cannot promise to repair a dead pixel or another screen defect.
Should I test a new display before the return window ends?
Yes. Test and document any repeatable point while the return or support window is open. Save the model, purchase details, date, photographs, marked location, and the exact manufacturer policy before trying a repair method.
How many dead pixels qualify for warranty service?
There is no universal threshold. Policies vary by manufacturer, model, region, defect type, and location. Use Pixel Test to document what you can observe, then check the exact policy for your display.